Adorable and simple skeleton paper garland is a delightful Halloween craft that brings creativity and festive charm to any space. My kids had so much fun with this project last year; they couldn’t stop talking about how they wanted to hang it up in every room! This activity is not only a fun way to celebrate Halloween, but it also allows kids to express their creativity and spend quality time together.

Why Make This Activity
Creating a skeleton paper garland is a fantastic exercise for developing fine motor skills, encouraging creativity, and promoting sensory play. As children cut, color, and string their paper skeletons together, they engage in a hands-on experience that enhances their hand-eye coordination and artistic abilities. This activity is perfect for birthday parties, school projects, or just a cozy afternoon at home. Whether you’re decorating for Halloween or looking to create a fun atmosphere for your classroom, this project is a great way to foster creativity and teamwork among siblings or classmates.
How to Make Adorable and Simple Skeleton Paper Garland! ☠️ A Fun Halloween Craft
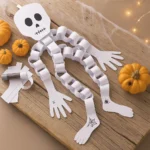
This craft involves making adorable skeletons from paper and stringing them together to create a festive garland. The goal is to have a colorful and spooky decoration that can be hung anywhere in your home or classroom. Kids will enjoy the hands-on aspect of this activity while adults can guide the process.
Materials Needed
- White construction paper (for the skeletons)
- Black construction paper (for the background and optional decoration)
- Scissors
- Glue stick
- Black markers or crayons
- String or yarn (for hanging the garland)
- Hole puncher (optional)
- Plastic tray (for easier cleanup)
Steps
- Begin by drawing skeleton templates on the white construction paper. Each skeleton should have a head, torso, arms, and legs. You can use simple shapes to make it easier for younger kids. Aim for about 6-10 skeletons, depending on how long you want the garland to be.
- Carefully cut out the skeleton shapes. Encourage older kids to cut out their own shapes, but younger kids may need some help. Keep safety scissors handy for younger children.
- Once all the skeletons are cut out, let the kids decorate them using black markers or crayons. They can add spooky details like skull faces, clothes, or accessories.
- Next, use a hole puncher to create holes at the top of each skeleton’s head. This step might require adult supervision for safety.
- Cut a long piece of string or yarn, making sure it’s the desired length to hang the garland.
- String the skeletons through the holes, spacing them evenly apart. You may want to tie knots in-between to keep them from sliding.
- Finally, find the perfect spot to hang your skeleton garland, and admire your collectively-created spooky décor!
Mini Tips
- For younger children, consider pre-cutting the skeletons to make the process easier.
- Use washable markers to avoid permanent stains and ensure a fun, stress-free cleanup.
How to Use or Play With Adorable and Simple Skeleton Paper Garland! ☠️ A Fun Halloween Craft
Once your garland is complete, it becomes a fantastic addition to your Halloween decorations! Kids can use it as a prop for imaginative play, pretending it’s a spooky ghost gathering or skeleton party. You could even create themed games around the garland, like a scavenger hunt involving skeleton parts. Continue the fun by inviting friends for a Halloween party, where they can help hang the garland and join in spooky activities!
How to Store or Reuse Adorable and Simple Skeleton Paper Garland! ☠️ A Fun Halloween Craft
This skeleton paper garland can last for several Halloweens if stored properly. After the festivities, gently fold it and place it in a sealed plastic bag or a flat storage container to keep it safe from damage. Storing it in a cool, dry place will help it maintain its quality for future use. If you want to freshen it up for subsequent years, consider giving it a little touch-up with markers or adding new decorations.
Tips to Make Adorable and Simple Skeleton Paper Garland! ☠️ A Fun Halloween Craft Successful
- Involve Everyone: Encourage kids to come up with their unique skeleton designs to promote individual creativity.
- Create a Cleanup Station: Set up a cleanup area with wipes and trash bags to help manage any mess during the crafting.
- Age-Appropriate Tasks: Assign cutting and gluing tasks based on age; older kids can handle scissors while younger kids can color.
- Use Strong Adhesives: If using glue, ensure it’s strong enough but safe; washable glue sticks are ideal.
- Set a Timer: If kids start to lose interest, setting a timer can keep them focused and help you pace the activity.
What to Avoid When Making or Using Adorable and Simple Skeleton Paper Garland! A Fun Halloween Craft
Common mistakes include using materials that are too flimsy for the intended display or skipping the drying time of glue, which can lead to a disappointing result. Make sure to supervise young children with scissors—using age-appropriate safety scissors can prevent accidents. Avoid making the decoration too complex for younger kids; keep it fun and simple!
Possible Variations
- Theme Change: Adapt the skeletons to other themes by adding pumpkins, ghosts, or even fall leaves for an autumn look.
- Material Swap: Experiment with different materials like foam sheets or colored cardstock for varied textures.
- Group Size Adjustment: If working with a large group, create a ‘Skeleton Factory’ where kids can work in stations, focusing on different elements of the garland.
FAQs
1. What materials are safe for young children?
When crafting with young kids, it’s essential to choose non-toxic and washable materials. Avoid scissors with pointed tips and use safety scissors instead. Use washable glue sticks and markers to make cleanup easier and prevent stains.
2. How do I clean up efficiently after the activity?
Before starting the craft, designate a cleanup area where you can gather supplies as you go. Use a plastic tray to contain any small scraps, and have wipes and trash bags handy. Encouraging children to help with the cleanup can also teach them responsibility.
3. What’s the ideal age range for this activity?
This activity is suitable for children ages 4 and up, with modifications available for younger kids. Supervise younger children closely, helping them with cutting and gluing, while allowing older children to complete more challenging tasks independently.
Conclusion
Creating an adorable and simple skeleton paper garland is a fun and engaging way to celebrate Halloween! Not only does it encourage creativity and fine motor skills, but it also offers an opportunity for family bonding. I hope you’ll try-out this craft and enjoy the process just as much as my family did. Share your creations with others and repeat the fun next Halloween! Happy crafting!
Skeleton Paper Garland
Ingredients
Materials Needed
- 1 sheet White construction paper For the skeletons
- 1 sheet Black construction paper For background and optional decoration
- 1 piece Scissors Keep safety scissors handy for younger children
- 1 stick Glue stick Ensure it’s safe for kids
- 1 piece Black markers or crayons For decorating skeletons
- 1 piece String or yarn For hanging the garland
- 1 piece Hole puncher Optional, for making holes in skeletons
- 1 piece Plastic tray For easier cleanup
Instructions
Preparation
- Begin by drawing skeleton templates on the white construction paper. Each skeleton should have a head, torso, arms, and legs. You can use simple shapes to make it easier for younger kids. Aim for about 6-10 skeletons, depending on how long you want the garland to be.
- Carefully cut out the skeleton shapes. Encourage older kids to cut out their own shapes, but younger kids may need some help. Keep safety scissors handy for younger children.
- Once all the skeletons are cut out, let the kids decorate them using black markers or crayons. They can add spooky details like skull faces, clothes, or accessories.
- Next, use a hole puncher to create holes at the top of each skeleton’s head. This step might require adult supervision for safety.
- Cut a long piece of string or yarn, making sure it’s the desired length to hang the garland.
- String the skeletons through the holes, spacing them evenly apart. You may want to tie knots in-between to keep them from sliding.
- Finally, find the perfect spot to hang your skeleton garland, and admire your collectively-created spooky décor!