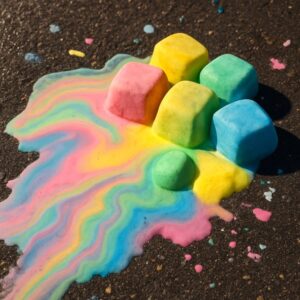
Homemade ice chalk is a delightful and creative activity perfect for kids of all ages. My kids had so much fun with this project on a hot summer day, and they couldn’t stop talking about the vibrant colors and fascinating textures they created! This activity involves making colorful chalk that can be used on driveways, sidewalks, or outdoor surfaces, adding an artistic twist to traditional drawing. It’s not just fun; it’s also a fantastic way to encourage creativity and sensory play.

Why Make This Activity
Creating homemade ice chalk is not only enjoyable but also offers multiple benefits. Children can explore their artistic side while developing fine motor skills as they mix, pour, and draw. It also provides an excellent opportunity for sensory play, engaging them with different textures and temperatures. This activity is ideal for birthday parties, school projects, or simply a sunny day at home with siblings or classmates. It promotes social interaction and teamwork, as kids collaborate to create and share their artwork.
How to Make Homemade Ice Chalk
Making homemade ice chalk is a straightforward and exciting process. Kids will be thrilled to see their creations come to life in vibrant colors. The goal is to produce colorful chalk that freezes into fun shapes, ready to be used outdoors. Adult supervision is recommended, especially during mixing or pouring. Kids can help with measuring ingredients and choosing colors!
Materials Needed:
- 2 cups of water
- 2 cups of cornstarch
- Food coloring (various colors)
- Ice cube trays or silicone molds
- Mixing bowl
- Whisk or spoon
- Plastic tray for easy cleanup (optional)
Steps:
- In a mixing bowl, combine 2 cups of water and 2 cups of cornstarch. Stir well using a whisk or spoon until the mixture is smooth and free of lumps.
- Divide the mixture evenly into other smaller bowls, depending on how many colors you wish to create.
- Add a few drops of food coloring to each bowl and mix until the colors are vibrant. You can adjust the colors as needed.
- Carefully pour the colored mixtures into ice cube trays or silicone molds. Fill them about three-quarters full to allow for expansion as they freeze.
- Place the trays in the freezer and allow them to freeze for at least 4-6 hours or overnight for best results.
- Once frozen, gently remove the chalk from the molds. You may need to let them sit at room temperature for a few minutes to loosen them up.
- Your homemade ice chalk is now ready to use!
Mini Tip: If you want larger pieces of chalk, you can use muffin tins instead of ice cube trays.
How to Use or Play With Homemade Ice Chalk
Kids can enjoy using their homemade ice chalk in numerous ways! Let them draw colorful art on driveways or sidewalks, turning plain surfaces into vibrant canvases. Encourage imaginative play by having them create designs and characters. You can incorporate educational activities, such as practicing letters or numbers, or engage them in storytelling by asking them to illustrate their favorite tales.
To guide their experience, provide prompts or themes to inspire their artwork. For example, they can create seasonal pictures or abstract designs. Observe how they interact with the chalk and engage in discussions about their artistic choices.
How to Store or Reuse Homemade Ice Chalk
Homemade ice chalk can last several days when stored properly. If you have leftover pieces, keep them in a resealable plastic bag or a sealed container in the freezer to maintain their quality. Be aware that once thawed, they should be used the same day. To freshen up the chalk, simply re-freeze any pieces that have started to melt or lose their firmness.
Tips to Make Homemade Ice Chalk Successful
- Measure Accurately: Ensure that you measure both the water and cornstarch accurately for the best consistency.
- Color Mixing: Experiment with color mixing for a fun twist. Let kids mix colors to create their unique shades!
- Supervision: Keep an eye on younger children, especially when using food coloring, to avoid any spills.
- Avoid Overfilling Molds: Don’t overfill the molds to prevent mess during freezing.
- Plan the Cleanup: Set up an area outside for washing up afterward to avoid mess indoors.
What to Avoid When Making or Using Homemade Ice Chalk
- Skipping the Mixing Step: Ensure the cornstarch and water are well-mixed to avoid lumps in the chalk.
- Using Non-Washable Colors: Stick to food coloring or washable paints to ensure easy cleanup.
- Too Much Water: Adding too much water can result in softer chalk that may break easily. Stick to the recommended ratio.
- Neglecting Supervision: Always supervise younger kids to ensure safe play and prevent accidental ingestion of materials.
- Using Old Ingredients: Make sure your cornstarch and food coloring are fresh for the best results.
Possible Variations
- Seasonal Themes: Create ice chalk in colors that match seasonal themes, such as pastel for spring or warm tones for autumn.
- Scented Chalk: Add a few drops of essential oil to the mixture for scented chalk; perfect for sensory play!
- Natural Colors: Use natural dye sources (like beet juice or turmeric) instead of food coloring for an eco-friendly twist.
- Group Activity: Increase the quantity to accommodate more kids for larger gatherings or parties.
- Different Molds: Experiment with different shapes and sizes by using various molds or containers.
FAQs
Q: Is homemade ice chalk safe for children to use?
A: Yes, homemade ice chalk is generally safe for children to use since it consists of non-toxic materials like cornstarch and food coloring. However, adult supervision is recommended to prevent any accidental ingestion of materials, and it’s advisable to use washable colors for easy cleanup.
Q: What age group is this activity suitable for?
A: This activity is ideal for ages 3 and up. Younger children may need help with mixing and pouring, while older kids can enjoy the process independently. Younger kids may also enjoy smearing and exploring the colors without any drawing.
Q: How can I adapt the activity if I don’t have food coloring?
A: If you don’t have food coloring, you can use natural dyes from fruits or vegetables (like beet juice for red or spinach for green). Alternatively, powdered drink mixes can provide color and are often easier to find.
Conclusion
Homemade ice chalk is a fantastic activity that combines creativity, sensory exploration, and outdoor fun! I encourage you to try this engaging project with your kids, and watch as they create vibrant art together. Don’t forget to share your colorful artwork with family and friends and consider revisiting this activity for more creative sessions in the future. Enjoy the messy, colorful fun!
Homemade Ice Chalk
Ingredients
Chalk Mixture
- 2 cups water
- 2 cups cornstarch
- food coloring (various colors) Use as needed for desired colors
Equipment
- 1 each ice cube trays or silicone molds
- 1 each mixing bowl
- 1 each whisk or spoon
- 1 each plastic tray for easy cleanup (optional)
Instructions
Preparation
- In a mixing bowl, combine 2 cups of water and 2 cups of cornstarch. Stir well using a whisk or spoon until the mixture is smooth and free of lumps.
- Divide the mixture evenly into other smaller bowls, depending on how many colors you wish to create.
- Add a few drops of food coloring to each bowl and mix until the colors are vibrant.
- Carefully pour the colored mixtures into ice cube trays or silicone molds, filling them about three-quarters full.
- Place the trays in the freezer and allow them to freeze for at least 4-6 hours or overnight for best results.
- Once frozen, gently remove the chalk from the molds. You may need to let them sit at room temperature for a few minutes to loosen them up.