Creating DIY bioplastic suncatchers is not only a fun craft project but also an excellent way for kids to explore creativity while learning about sustainable materials. My kids had so much fun with this project on a rainy afternoon—they couldn’t stop talking about how magical their colorful creations looked hanging in the window! This activity is exciting because it combines art, science, and environmental awareness. Making these suncatchers is a fantastic way to delve into hands-on learning while enjoying precious family time together.
Why Make This Activity
This activity offers numerous benefits for kids ranging from sparking creativity to enhancing fine motor skills through the crafting process. Bioplastic suncatchers encourage sensory play, allowing children to engage with textures and colors. Additionally, kids can explore concepts like sustainability and the science behind bioplastics, making this a great STEM learning opportunity. It’s an ideal activity for birthday parties, school projects, or just some home fun on a weekend. Plus, it encourages collaboration as siblings or classmates can work together to create beautiful designs.
How to Make DIY Bioplastic Suncatchers
Creating bioplastic suncatchers is simple and allows for imaginative expression. Your goal is to create colorful, translucent shapes that catch and reflect sunlight beautifully. While the project is safe and enjoyable for kids, adult supervision is recommended, especially during the cooking phase of making the bioplastic.
Materials Needed:
- 1 cup water
- 2 tablespoons corn syrup
- 2 tablespoons white vinegar
- 1 cup cornstarch
- Food coloring (various colors)
- Wax paper
- Cookie cutters or templates
- Mixing bowl
- Spoon
- Pot for cooking
- Non-stick cooking spray (optional)
Steps:
Mix the Ingredients: In a mixing bowl, stir together the water, corn syrup, and white vinegar. Add the cornstarch gradually, mixing well until you have a smooth, runny mixture.
Add Color: Divide the mixture into separate bowls and add different food coloring to each one, adjusting to your desired shades.
Cook the Mixture: Pour the mixture into a pot and cook it over medium heat. Stir continuously until the mixture thickens to a consistency similar to glue—about 3-5 minutes. Make sure to keep the heat low to avoid burning.
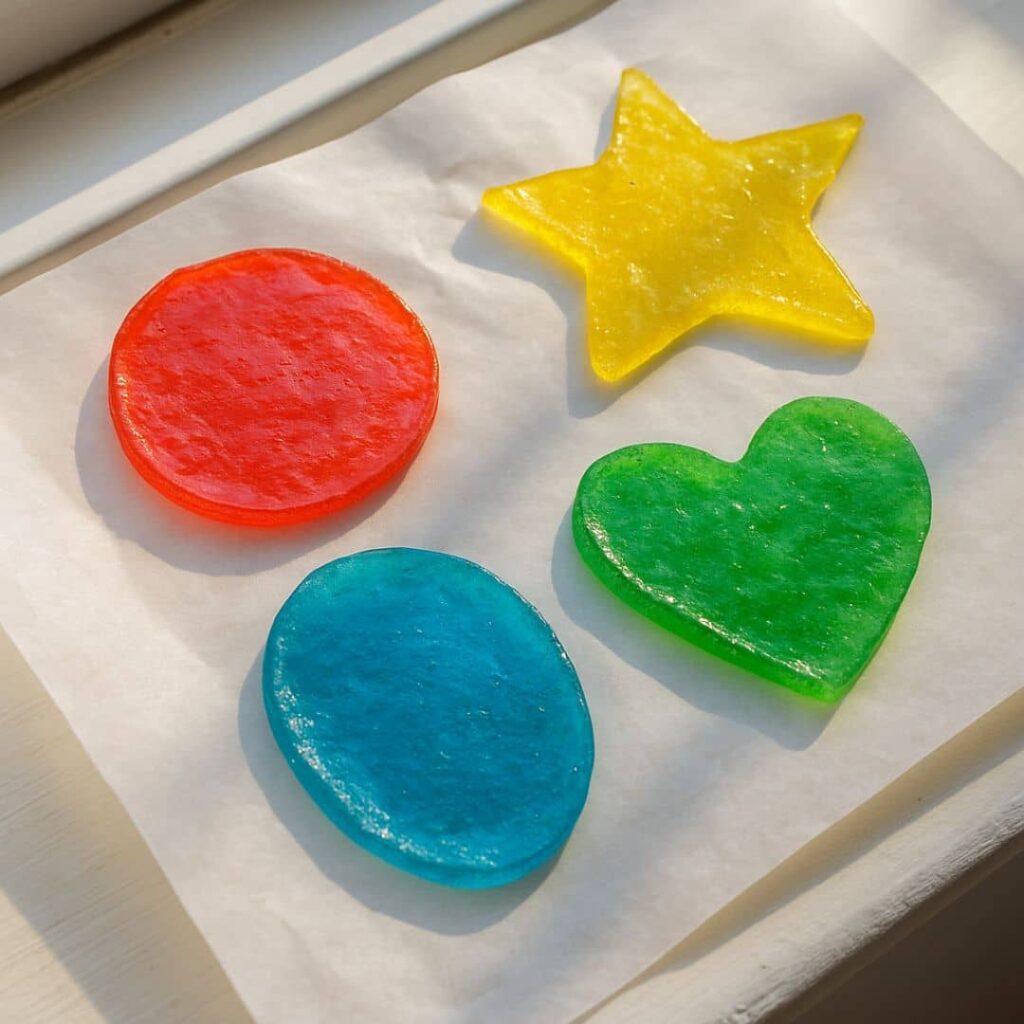
Cool and Shape: Once thickened, remove the pot from the heat and allow it to cool for a few minutes. When it’s cool enough to handle, spoon it onto a piece of wax paper. Use cookie cutters or templates to create shapes by spreading the mixture to fill the outlines.
Dry the Shapes: Allow the suncatcher shapes to dry for about 24 hours. If possible, flip them halfway through to ensure both sides dry equally.
Display Your Art: Once dry, gently peel the suncatchers from the wax paper and hang them in windows using clear tape or suction cup hooks to enjoy the colors shining brightly.
Mini Tips:
- If your mixture is too thick to spread, simply add a tiny bit of water and stir until it reaches the right consistency.
- Use non-stick spray on your cookie cutters to make clean removal easier.
How to Use or Play With DIY Bioplastic Suncatchers
After your suncatchers are finished, the fun continues! Hang them in windows to create a beautiful rainbow of colors in your home. Encourage imaginative play by having kids describe stories about their creations—what the colors mean or where they come from. For educational purposes, you can talk to your children about light refraction or the science behind biodegradable materials. Observing how the colors change with the sunlight can also inspire further questions about light and nature.
How to Store or Reuse DIY Bioplastic Suncatchers
If stored properly, your bioplastic suncatchers can last for several months. Keep them in a cool, dry place out of direct sunlight to prevent them from becoming too brittle. Using a cardboard box or a sturdy plastic container will help protect them. If the suncatchers begin to look dull, you can soak them in a mild soapy solution and rinse gently to freshen them up.
Tips to Make DIY Bioplastic Suncatchers Successful
- Prepare Your Workspace: Cover your table with newspaper or an old tablecloth to manage any mess during the craft.
- Involve Kids in Clean-Up: Turn clean-up into a fun game by having them help gather materials and wash mixing bowls.
- Choose Safe Colors: Select food-safe colors or natural dyes for younger children to ensure safety.
- Be Patient During Drying: Resist the urge to rush the drying process; a good, full day of drying ensures sturdiness.
- Adapt for Skill Levels: Adjust the complexity of the shapes based on the child’s age; younger kids may prefer larger, simpler outlines.
What to Avoid When Making or Using DIY Bioplastic Suncatchers
Common pitfalls when making bioplastic suncatchers can include using ingredients that are not entirely safe, like non-food-grade dyes. Also, skipping the drying step can lead to suncatchers that don’t maintain their shape. For younger kids, avoid overly intricate designs, as they may struggle with precision. Lastly, don’t rush the cooking process—cooking it too quickly can lead to lumps in your mixture.
Possible Variations
- Seasonal Themes: Customize suncatchers according to seasons or holidays, such as making leaf shapes for fall or snowflakes for winter.
- Alter the Materials: Swap out cornstarch for gelatin for different textures; just be sure to adjust the color and shaping techniques accordingly.
- Change the Group Size: For classroom use, you can create suncatcher ‘stations’ where groups work on their designs separately.
FAQs
1. Is this project safe for young children?
Yes, the materials used to make bioplastic suncatchers are child-friendly. However, adult supervision is necessary, especially during the cooking step. Make sure to explain the importance of working near the stove and what to avoid.
2. What should I do if I don’t have all the materials?
If you’re missing certain ingredients like corn syrup or vinegar, you may try using fruit juice or other safe alternatives. Just remember that the suncatcher’s texture might change. You can still create using a basic cornstarch and water mixture.
3. What’s the ideal age range for this activity?
This craft is suitable for children ages 5 and older, with varied levels of adult involvement. Younger kids may need more help, while older children can take on most of the process independently.
Conclusion
Making DIY bioplastic suncatchers is a delightful mix of art, science, and fun—perfect for a rainy day or as part of a larger educational project. I encourage you to gather your materials and try this project with your kids. Watch their creativity blossom as they experiment with colors and shapes. Don’t forget to share your creations with friends and family or even plan to do it again with different themes in the future!

Bioplastic Suncatchers
Ingredients
Main Ingredients
- 1 cup water
- 2 tablespoons corn syrup
- 2 tablespoons white vinegar
- 1 cup cornstarch
- food coloring (various colors) Adjust colors to desired shades.
- wax paper For shaping the suncatchers.
- cookie cutters or templates For shaping the suncatchers.
- mixing bowl
- spoon
- pot for cooking For thickening the mixture.
- non-stick cooking spray (optional) To facilitate shape removal.
Instructions
Preparation
- In a mixing bowl, stir together the water, corn syrup, and white vinegar.
- Gradually add the cornstarch, mixing well until you have a smooth, runny mixture.
Add Color
- Divide the mixture into separate bowls and add different food coloring to each one, adjusting to your desired shades.
Cooking
- Pour the mixture into a pot and cook it over medium heat, stirring continuously until it thickens to a consistency similar to glue—about 3-5 minutes.
- Keep the heat low to avoid burning.
Shaping
- Remove the pot from heat and allow the mixture to cool for a few minutes.
- Spoon the mixture onto a piece of wax paper, using cookie cutters or templates to create shapes.
Drying
- Allow the suncatcher shapes to dry for about 24 hours, flipping them halfway through for even drying.
Display
- Once dry, gently peel the suncatchers from the wax paper and hang them in windows using clear tape or suction cup hooks.